Fluid Uptake

Contents
The fluid uptake operations are available to users of PoreXpert Standard and higher.
The fluid uptake screen allows you to perform wetting simulations or non-wetting fluid intrusion, you can choose between these operations by ticking the percolation check box in the top right hand corner of the screen. The fluid uptake screen is shown in the next figure.
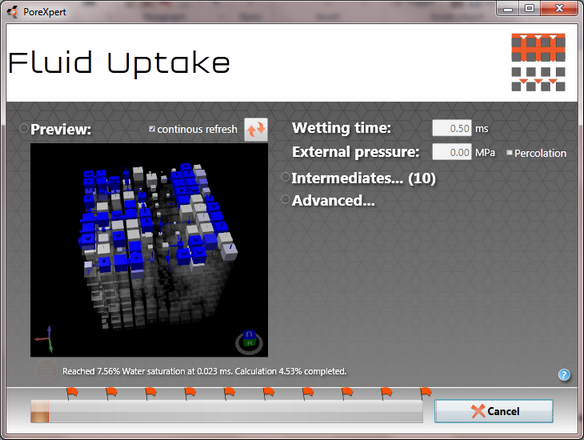
PoreXpert Fluid update screen with a partially wetted unit cell shown in the preview screen, the default settings include a live update preview screen, which updates as the calculation progresses, for unit cells larger than 10 x 10 x 10 the software turns off the continuous refresh option. If you have a slow computer it may be better to turn off the preview screen as it reduces the speed of the calculation.
The fluid uptake screen on the left hand side has a preview window. If you untick the continuous refresh box and want to view the unit cell structure press the refresh button located just above the cell inspector window.
Wetting Simulation
To perform a wetting simulation you need to enter a time into the wetting time box in milliseconds. Longer wetting times may take a very long time to complete, and if you find that the wetting simulation will take too long you can cancel the simulation by clicking the cancel button after starting the simulation. The wetting simulation can also be run with an external positive pressure by filling in the external pressure box, this parameter is optional and by default is 0 MPa, the maximum applied pressure is 10,000 MPa. The default wetting simulation time is 0.5 milliseconds. It is also possible to specify a percentage that you would like the wetting fluid to occupy and the program will run the wetting simulation until the uni cell is filled to the saturation level you specify.
Non-Wetting Fluid Percolation
The non-wetting fluid percolation is activated by ticking the percolation box on the right hand side of the screen. By ticking this box the wetting time box is greyed out and you can enter a pressure in MPa into this box. The maximum pressure of a mercury porosimeter is 414 MPa which is equivalent to a diameter of 3 nanometres. The pressure that is applied will have a different diameter depending on the intruding fluid. The table below includes a list of pressures and the equivalent diameter for the default intrusion fluid which is mercury at room temperature. The diameter has been calculated using the Laplace diameter.
Pressure (MPa) |
Diameter (μm) |
0.01 |
148 |
0.1 |
14.8 |
1 |
1.48 |
10 |
0.148 |
50 |
0.0297 |
100 |
0.0149 |
150 |
0.00991 |
200 |
0.00743 |
250 |
0.00595 |
300 |
0.00495 |
350 |
0.00426 |
400 |
0.00371 |
414 |
0.00359 |
Intermediates
The intermediates menu is shown in the next figure and this allows you to choose to have intermediate percolation or wetting structures generated equally throughout the wetting time or pressure increments. For a small number of intermediate structures we recommend that you save the intermediate structures to the current operations list. If you are going to generate a large number of intermediate structures (more than 25). The maximum number of intermediates structures that can be saved is 100. We recommend that you save the intermediate structures in an external PoreXpert file, by selecting Save in external file which you can choose the name and save location by clicking on the select button, in the intermediates menu. It is possible to then combine some of the external wetting structures by using Append operations in the file menu on the home screen.

Intermediate structure menu from fluid uptake screen.
Advanced Controls
The advanced controls allow you to change the location of the super source, the liquid being used to intrude into the sample and the solid phase material. the advanced menu is shown in the next figure.

Advanced fluid uptake options which are explained below.
Super source
In PoreXpert it is possible to choose the position that the intruding fluid wets the unit cell or intrudes into the unit cell under pressure. There are six default positions available for the super source and these are the top, bottom, left, right, front and back of the unit cell. It is also possible to choose a manual position for the super source to be connected to the unit cell. For example you could start the intrusion in the centre of the unit cell. The super source screen is shown in the next figure.
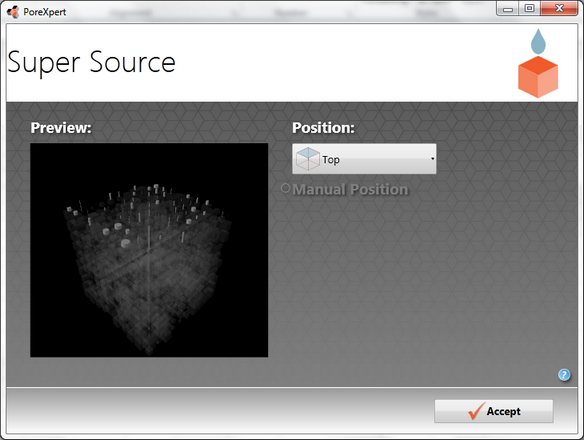
PoreXpert super source screen used to choose the position of the super source for fluid uptake and fluid migration operations.
You can also change the super source material using any fluids that have been added to the materials database. this allows you to simulate wetting at different temperatures or see how fluids intrude with different contact angles.
Skeletal material
The skeletal material option allows you to use different properties for the solid phase material, which will change the colour in the unit cell viewers.
Note: Wetting Operation
This operation may take a very long time to complete, depending on your hardware capabilities, unit cell size, wetting duration and the size of the smallest feature.